Scrapbooking Elements

I have completed a few more scrapbooking elements for a group I belong to in the USA. The themes were Sea Shells(tile accents) and Summer Fun(on-board accent stars). As with my swap elements before, I had to use certain stamp sets and colours of cardstock/ink. The pictures of these elements did not turn out very well, but I thought that I would share them with you regardless. Please click on the pictures to see a closer image.
On-Board Accent Stars: I first inked the entire chipboard star with a White Craft ink pad. I le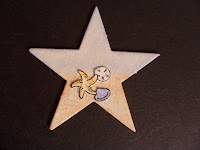 t it dry a little and then sponged the top on the star using Bashful Blue Classic ink and the bottom of the star with Pumpkin Pie classic ink as well as wheeling on the Sandy Shells images using Pumpkin Pie ink directly onto the bottom of the star. I did this to create the sand and sky. I then used Black Staz-On ink to ink the Sandy Shells wheel and rolled it on Whisper White cardstock.
 t it dry a little and then sponged the top on the star using Bashful Blue Classic ink and the bottom of the star with Pumpkin Pie classic ink as well as wheeling on the Sandy Shells images using Pumpkin Pie ink directly onto the bottom of the star. I did this to create the sand and sky. I then used Black Staz-On ink to ink the Sandy Shells wheel and rolled it on Whisper White cardstock.
 The Sanddollar: left white, tombo liquid glue was applied and then I applied dazzling diamonds glitter.
The Starfish: Using a blender pen, I dipped it in the Pumpkin Pie ink that I had squeezed onto the lid of the ink pad and coloured the image. I applied the liquid glue just on the "arms" of the starfish and applied clear micro beads.
Clam Shell: Again, using the blender pen dipped in ink as above, I coloured this image using Bashful Blue ink. Liquid glue applied and light blue fine cosmo glitter applied.
Tile Accents: These tile accents are only 1-1/4 inches square! I first cut Bashful Blue cardstock into 1-1/4 inch strips. I then inked the end of the pennant flag of the sail bo
 at from the Winds of Grace stamp set using the Brocade Blue Stampin' Write Marker to make the seagulls. I also lightly sponged bashful blue ink onto the BB cardstock. I wheeled the Sandy Shells wheel through Sahara sand ink and rolled onto Sahara Sand cardstock. This card stock was then torn to create "sand". I glued this strip of cardstock to the bashful Blue cardstock using Stampin' Up!'s Everywhere glue stick. Once the strip of sahara sand cardstock was applied, I then cut the tiles again to be 1 -1/4 inch square. The individual shells were wheeled onto Confetti White cardstock using Staz-On ink, coloured, glitter, microbeads or Crystal Effects applied and then cut out. Each were adhered to the tiles using Crystal Effects.
I hope that you find some inspiration in these scrapbooking elements.
Happy stamping and scrapping!
Stacey
(images copyright Stampin' Up! 1990-2008)
posted by Stacey's Stamping Studio @ 8:39 p.m.
10 comments
![]()


