Friday, April 25, 2008

Scrapbook Title Bar

Thank you for the wonderful feedback about my scrapbook borders from my last post. I really appreciate it! Scrapbooking is such a wonderful way to be creative. But it is also a wonderful way to display the photos of the memories which are important in your life. I hope that you find some inspiration in my creations to help you with your scrapbooking creativitiy.
I thought that I would also share with you the other scrapbooking element swap that I have completed. My element for this swap was to create a title bar for the swap theme Sea Shells. The colours for this swap are: Blush Blossom, Sage Shadow, Brocade Blue, Bashful Blue, Sahara Sand, Confetti White, and black to stamp the shells. Of the stamp sets that were allowed I used the Seaside stamp set, Winds of Grace, and the title was done using the Short Order Alphabet stamp set.

Here are a few details of how I brought the title bar together.

The 'sand' was created using the 'sand/wave' stamp from the Winds of Grace stamp set and was stamped using Sahara Sand ink. This stamp could also be used to create clouds. Very versatile!

The shells were stamped on scrap pieces of cardstock. The blush blossom and sahara sand colouring was done using Stampin' Write Markers, and the Bashful Blue was added using a blender pen dipped into ink that I squeezed onto the ink pad lid. The 'spines' of each Scallop Shell were highlighted using Crystal Effects. This was a great way to give a little shine as well as a raised texture to the shells. The Spindal Shell was coloured the same way but I also used Sage Shadow. There is also Crystal Effects appied to each 'lined' detail of the Spindal Shell. To attach the shells, I simply cut out each image, used SNAIL adhesive to apply the Spindal Shell directly to the title page and the Scallop Shells were raised off of the page using Stampin' Dimensionals.

I purposely stamped the title in a 'wave'. Not only did it fit with the theme, it is also much easier to stamp letters tilted then try to stamp them all straight in a row. If you like to stamp your letters straight in a row, I would recommend using the Stamp-A-Ma-Jig to get the proper placement.

A few little details that added to this title bar: I sponged Bashful Blue direct to cardstock all over the 'sky' as well as around the edge of the cardstock where the 'sky' is. I sponged Sahara Sand around the cardstock edges where the 'sand' is. This helped to blend the Confetti White cardstock into the matted pieces. The Sahara Sand cardstock is torn just on the sides where the sand matches up. One other detail was the Seagulls. I coloured direct to stamp using the Bordering Blue Stampin' Write Marker to the last portion of the Pennant Flag of the sailboat stamp from the Winds of Grace. A little bit of 1/4 inch Bashful Blue grosgrain ribbon finishes off this title bar.


Happy creating!


Stacey


(images copyright Stampin' Up! 1990-2008)

Thursday, April 24, 2008

Scrapbook Page Elements

I have recently been welcomed into a Scrapbook Elements Swap Group in the United States. There are many talented American SU! Demonstrator's who take part in these swaps and I can't wait to receive my first swap elements! I do believe that I am the only SU! Canadian demonstrator within this group.

Posted here are my first Swaps that I designed for one of the current swaps. I was to create border strips for the swap theme 'Spring Magic'. There are certain colours of cardstock, specific stamp sets and other "rules" that you must follow. The colours used here are: Pretty in Pink, Whisper White, Certainly Celery, and So Saffron. I used StazOn jet black for the outlined images. All of the papers, inks, and accessories used must use these colours. I have done quite a bit of masking within the images to achieve many different 'layers' of images. Stampin' Write Markers were used to colour the leaves and a blender pen using stamp pad ink was used to colour the images.

The butterflies were first stamped on the main border cardstock. I stamped additional butterflies on scrap cardstock. I used 2-Way glue to each wing then applied Dazzling Diamonds glitter. I then cut out each butterfly and attached just the 'body' of the butterfly ontop of the butterfly which I stamped on the main border cardstock using sticky strip which I cut into fine strips. You can see in the second picture that the wings are then slightly bent to be raised off the page. A pink bead from the bead duos was glued using Tombo Multi Liquid Glue to the 'head' of each butterfly. A brad was put in the center of 3 of the flowers and it was put through all layers of the cardstock for additional reinforcement of the layers.
Other details: smaller corner rounder to the 'inside' corners, certainly celery ink sponged to the edge of the whisper white cardstock which 'touches' the certainly celery cardstock to help blend it in.


Stamp sets: Embrace Life, and Garden Whimsy

Happy Scrapbooking!

Stacey

(images copyright Stampin' Up! 1990-2008)

More 2-4-6-8 boxes

My last post had a 2-4-6-8 box that I made using the Stems & Silhouettes jumbo wheel and the Wonderful You stamp set that are featured in the Free Wheelin' Promotion.

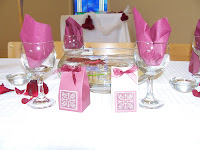
After posting the box, it reminded me of the 136 boxes that I made for a wedding. So I thought that I would share with you a few pictures of the boxes. The colours are Sahara Sand and Bravo Burgundy. The burgundy organdy ribbon and the Mostly Flowers stamp set are now retired. These boxes were the favors on the reception tables for each guest at the wedding. Inside was a mini ziploc bag with wild flower seeds and a little message to the guests. The boxes looked much more elegant in person. The image on the front was stamped using Bravo Burgundy Craft Ink and then was embossed using Crystal Clear Embossing Powder. They were simple but elegant, just what the bride wanted.

Along with the favors I also made the wedding invitations and the reply cards that all coordinated with one another. It was a lot of fun...especially seeing my creations at the place settings. The bride let me know where the wedding reception was, so I was able to sneak a few pictures before they arrived at the reception!

Don't forget that you can click on any picture within my posts to make it larger to get a better look!

2-4-6-8 boxes: great for wedding favors, birthday surprises, to give someone a special message or chocolate.

Happy Stampin'!

Stacey

(images copyright Stampin' Up! 1990-2008)

Thursday, April 17, 2008

Free Wheelin'!

I had some fun recently with one of my FREE wheels from the FREE WHEELIN' Promotion. I purchased the stamp set and received the jumbo wheel for FREE!
Last night I was at a customer's house doing a workshop and I made the following two projects. The 2-4-6-8 box contained the door prize and the clear decorated box containing a stamp pad was a gift for my hostess.

I wheeled the Stems & Silhouettes on a sheet of 8 1/2 X 11 Certainly Celery card stock using Old Olive ink. To create the flower, I stamped just the outlined flower image from the Wonderful You stamp set with Jet Black StazOn ink on Very Vanilla cardstock. I then coloured in the image with Stampin' Write Markers(Rose Red, Regal Rose and Summer Sun). Once coloured I cut the images out. I left the stem on the image on the clear decorated box. The labels 'ENJOY' and THANK YOU' are from the Lovely Labels stamp set. I used are Designer Label and 1 -1/4 inch punches on these projects. The flowers were put on the projects using Stampin' Dimensionals for added interest. The ribbon on the 2-4-6-8 box is 1/4 inch Grosgrain ribbon in Very Vanilla.


Here is a list of the FREE WHEELIN' Promotion stamp sets and wheels. This promotion is on now until April 30th!


112848 Wonderful You bundle — $39.94 CDN(includes Wonderful You stamp set and free Stems & Silhouettes jumbo wheel)

112851 Life’s a Breeze bundle — $35.29 CDN(includes Life’s a Breeze stamp set and free Something Fishy jumbo wheel)

112850 Pun Fun bundle — $37.15 CDN(includes Pun Fun stamp set and free Sweet Stars jumbo wheel)

112847 Year after Year bundle — $37.15 CDN(includes Year after Year stamp set and free See You Around jumbo wheel)

112849 Stitched Exotics bundle — $39.94 CDN(includes Stitched Exotics stamp set and free It’s Beautiful jumbo wheel)

112853 Enjoy Every Moment bundle (French or English) — $35.29 CDN(includes Enjoy Every Moment stamp set and free Daisy Dash jumbo wheel)

Happy Stampin'!
Stacey
Images copyright Stampin' Up! 1990-2008


Thursday, April 10, 2008

Loonies for Littles

I am excited to let you know that Stampin' Up! has teamed up with the Direct Sellers Association to offer a special promotion benefiting the Big Brothers Big Sisters of Canada. This promotion is just for Canadians and for one of our most important charities.

Stampin' Up!’s 1st Canadian-only campaign is called "Loonies for Littles". For each ‘Loonies for Littles’ kit sold, SU! will be donating $2 to Big Brother/Big Sisters of Canada Organization!

I have a special bond to this fabulous organization as I am a Big Sister to my special "little" Marie-Elise! As this organization means so much to me, I endeavor to personally help out Big Brothers/Big Sisters(BBBS) of Victoria. For every kit that I personally sell, I will donate $2 to BBBS of Victoria.

As a thank you for helping me, anyone who places a pre-order of this kit through me by noon on April 15th, you will be invited to a FREE stamping event in Victoria, BC where you will stamp cards that I will have designed using the ‘Loonies for Littles’ Kit(date to be announced). All that you will have to do is bring your stamps and inks from your kit as well as your choice of adhesive! All other supplies to complete the projects will be supplied for you. Feel free to pass this opportunity along to others that may be interested and thank you for your help!


Here are the Campaign Details:
Purchase a Loonies for Littles Stampin' Kit for $32.50 ($34.95 special offer price less a seven percent price adjustment) and Stampin' Up! will donate $2 to Big Brothers Big Sisters of Canada (BBBSCA). Price after shipping and taxes $40.04.
  • The Loonies for Littles campaign benefits the "Littles" (kids) and "Bigs" (adult volunteers) in the BBBSCA's In-School Mentoring program.

  • The Loonies for Littles Stampin' Kit includes the following:

  • *Exclusive double-mounted Good Together stamp set
    *One 5" x 5" On Board Art Journal
    *Two sheets of double-sided Designer Series paper from Boho Blend Simply Scrappin'
    *Three sheets of self-adhesive die cuts from Boho Blend Simply Scrappin'
    *Four sheets of 12" x 12" textured card stock
    *Two Classic Stampin' Spots: 1 Old Olive, 1 Pumpkin Pie
    *Full-color insert with photos of projects, along with step-by-step instructions
    *One Craft Keeper


    • This kit, including the stamp set, was designed exclusively for this campaign and will not be offered again after May 31, 2008.

    • This offer is available only in Canada and runs from April 15th - May 31st, 2008.
    Here are pictures to show you an example of how to decorate the cover and inside pages. You will receive a colour copy of these samples with your kit as well as step by step directions with your package.

    I hope you'll consider purchasing this fabulous little kit - it would be perfect as a gift or for a project to do with your children or the children in your lives. Wouldn't it make a cute Mother's Day or Father's Day gift? Participating also gives you the satisfaction of knowing that you've also contributed to the well-being of some pretty special kids!

    Check out the promotion on the Big Brothers Big Sisters Canada site and their In-School Mentoring Program.

    Sincerely,

    Stacey
    (images copyright Stampin' Up! 1990-2008)